

Welcome back to Part 2 of “How to Create a Faux Beam.” Hopefully you found my last tutorial outlining what you’ll need for supplies along with some tips and tricks for measuring and cutting your wood useful. Did you take all your measurements? Great! Measure a second time to make sure! I’d hate for you to start cutting and realize you were off by 1/8″! Were you able to get all the supplies you need? Got your wood? Awesome! Let’s dive into how to bang up your boards to make them look more rustic and how to fasten them to each other to create that classic “C” shape you’ll need to install your faux beam. I’ll also teach you how to stain the wood and seal it.
As a reminder, I have broken this project up into three steps to make it easier to follow along. Find my post for Part 1 here.
Part 1: Materials/Wood
Part 2: Banging/Nailing Together/Staining
Part 3: Installing/Finishing Touches
Here are the materials you’ll need for the entire project. I’ve highlighted the ones you’ll need for this second step in blue:
- Mitre Saw
- Finishing Nail Gun (I own and really like the Ryobi Finishing Nailer
)
- Finishing Nails (2″ for installation and 1.5″ for nailing boards together)
- Wood (measurements will need to be custom made to fit your particular space)
- Stain (I used Minwax Dark Walnut
)
- Polyurethane (I used Minwax Clear Satin Finish
)
- Foam brushes (You’ll want a handful of these so you can just throw them out after each use)
- Staining pads
- Wood Glue (I used Titebond
)
- Sandpaper
- Trigger Clamps (I used this Dewalt Trigger Clamp 4 Pack
)
- Latex gloves
- Metal strips (I bought three of these but you may need more or less depending on the size of your project)
- Spray paint for your metal brackets (I used Rustoleum Metallic Oil Rubbed Bronze
)
Step 1: BANG ‘EM UP!
Remember these pretty pine common boards you bought? You’ll want to lay them out and pick which side of each board you like the best. That will be the side you’ll want to face out when you build your beam. I chose the ones that had the most knots and grains in them in an attempt to bring some character to the beam. Next, decide whether the board would look best on the bottom, the left or the right side of your beam. Do you want the knots on the top or the bottom of the board? Maybe you’ll want to flip it upside down to show off these markings.

Now that you’ve chosen the prettiest side of each plank of wood, it’s time to rough them up! This is great if you’re having a bad day and can’t make it to a yoga class. I know you’ll find it as therapeutic as I did to just whack the you-know-what out of these boards!


Use anything and everything that will make a dent, scratch, ding, you name it! I used both sides of a hammer as well as a wrench. Make sure you only bang up the edges that will be facing out. If you bang up the wrong side, you won’t be able to glue it to the underside of the beam. You’ll also want to ensure that all your boards are roughed up uniformly. You don’t want one board to have a ton of markings in it and another to only have a few.
I’ve heard of people sandwiching rocks between two boards and jumping on top. I didn’t feel like going that wild, so I stuck to my common household tools. But hey, you do you.


Wasn’t that cathartic? And you didn’t even need to pay a co-pay! Okay, you’ve banged up your once beautiful boards and now it’s time to build your classic “C” shape seen here:

You’ll need three things for this step: a finishing nailer, trigger clamps, and wood glue.
Take the board that will be the underside of your beam and run some wood glue along one of the edges. Glue either the right board or left board to the underside piece and hold it together with trigger clamps. Use your finishing nailer to nail the pieces together while the glue dries. Repeat for the other side of the beam and hold the whole thing together with trigger clamps until the glue is dry. If you have big enough trigger clamps, you can build both sides and hold the whole “C” shape together at once.


It’s important that the wood glue not run out and drip down the sides of the boards once you glue them together. Simply put: you cannot stain over wood glue. As you can see, we didn’t realize that and one of our beams now looks like this:

So what are you supposed to do if that happens? Well, you have three options.
- You could sand the glue off once it dries but I would not recommend that since it may change the shape of your beam.
- You could tape the wood off before you apply the glue so any excess that runs out will spill onto the tape. This is risky, as it could still potentially leak underneath the tape.
- My suggestion would be to either wipe it with a DAMP cloth or let the glue dry up and bead and then scrape it off with a razor blade. Wiping it with a dry cloth only spreads it deeper into the pores of the wood.
Heat and moisture in the air can cause the boards to warp a bit so make sure you keep them in a cool, dry place. It’s helpful to place a wooden block that is the same width as your underside board in the middle of your “C” shape so it is less likely to pull into itself as the glue dries. Position your trigger clamps against this block of wood for extra reinforcement.

Step 2: STAIN
Yay! You created your “C” shapes and you’re ready to stain your wonderful creations. For this project, I used Minwax stain in the color “Dark Walnut” to match our farmhouse kitchen table. Use a foam brush and wear some latex gloves so you don’t get the stain all over your hands. As always, make sure you apply the stain in the direction of the wood grain.

It’s important not to rush the staining process. Projects like this that take so much time and effort can be really exciting and I know I’m often guilty of rushing through steps because I want to see the end result. Resist the urge to put a second coat of stain on your boards before the first one has fully absorbed. Stain is not like paint. You can’t just touch it to know that it’s dry. The stain needs to settle into the pores of the wood and that takes time. If it says to wait eight hours before applying polyurethane, wait eight hours. Always read the instructions.
Wait five minutes after applying each coat of stain and then use staining pads to wipe off any excess stain that has not absorbed. This is important. If you just let the stain sit, it’ll dry unevenly and look sloppy. Wipe the staining pads along the wood (with the wood grain) as though you were trying to wipe off all the stain you just applied.
You can get creative with your technique here. The more you rub, the more stain will come off. If you have a knot in your pine that you want to show off, for example, you’ll want to spend more time wiping away the stain in that area.

Step 3: SEAL
After applying two coats of stain, I applied two coats of Minwax Clear Satin Polyurethane. There is no fancy way to put this on. Just make sure your brush strokes go in the same direction as the wood grain.

Here you can see the middle board has been coated in polyurethane and the side boards have not. The polyurethane not only seals the boards and protects them but the satin finish also also gives them a nice sheen without being too glossy.

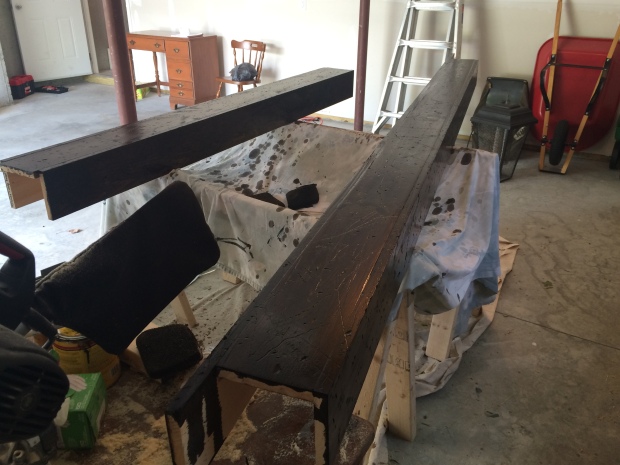
Here are our final two beams! They are ready to be installed. Can’t wait to do it this weekend! Stay tuned for my final post in this three-part series next week where I will show you how we installed these beauties and how we created some cheap DIY metal brackets to spruce them up a bit.


This looks so great! I can’t wait to see the final product!
LikeLike
This is amazing! Looks like a professional job!
LikeLike
Amazing job!! What a great idea to dress up home ~ looks great and very professional !
LikeLike